One of Fugue's most powerful features is the ability to run custom rules against cloud infrastructure or infrastructure as code (IaC). This allows you to enforce enterprise policies such as tagging requirements, security measures, or other internal best practices.
For instance, you can write a custom rule to check whether versioning is enabled for Google storage buckets. Or, you can check whether Azure log profiles log the Delete category. (For more examples of custom rules, see our custom-rules
GitHub repo.)
You can create individual rules in the Fugue UI, CLI, or API. But if you have a lot of rules, it's considerably easier to manage them when you bulk upload them automatically with the CLI as part of a CI/CD pipeline. This way, whenever you update the rules in your source code repository, your CI/CD tool syncs the rules to Fugue — no additional effort required.
For this blog post, we've created example configuration files for two common CI/CD tools, Travis CI and CircleCI. But you can use any CI/CD tool, as long as it can install the Fugue CLI (and we provide packages for macOS, Linux, and
Windows)!
About syncing custom rules
The way we'll bulk upload a directory of rules to Fugue is with the Fugue CLI's fugue sync rules command. This operation — unique to the CLI — syncs a directory of rule files to Fugue, creating new custom rules or updating existing ones.
Be aware that fugue sync rules is a one-way sync from your rules directory to Fugue. Rule changes you make in Fugue are not synced back to your rules directory. So, it's best to keep your code repository as the "source of truth" and make any changes to rules from there, rather than tweaking them directly in Fugue.
Setup
There are 5 steps to set up rule syncing via CI/CD:
- Create a code repository
- Set up the CI/CD tool
- Create an API client ID and secret in Fugue
- Add the client ID and secret to the CI/CD tool
- Commit custom rules to the repository
Let's get started!
1. Create a code repository
First, create a code repository using a service such as GitHub, Bitbucket, or
GitLab (among others). This is where you'll store your Fugue custom rules, which we'll add in step 5.
2. Set up the CI/CD tool
Next, set up the repository with your chosen CI/CD tool. You can copy our example configuration file for Travis CI or CircleCI, add the file to the repo, and then commit and push it. Once you do that, you can set up the CI/CD tool. (See
Travis CI's instructions or CircleCI's instructions for getting started with a GitHub repo, for example.)
3. Create an API client ID and secret
After that, you'll need to log into Fugue to create an API client ID and secret. The Fugue CLI is a wrapper for the Fugue API, which means under the hood it's really making API calls. To authenticate with the Fugue API, you should create a client
ID and secret by following these steps:
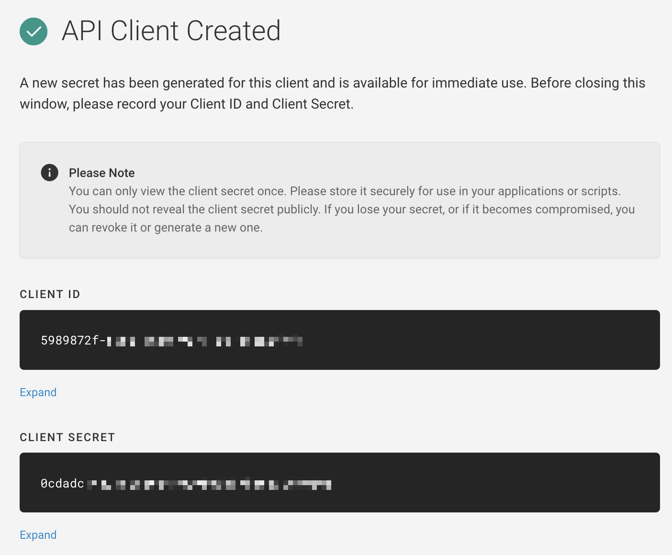
- In the Fugue UI, navigate to Settings, then API Clients.
- Select Create New API Client.
- Give your client a memorable name, like "Travis CI Rules Sync."
- Assign the client to an RBAC group. Make sure the group has an Contributor, Manager, or Admin policy. (For more about RBAC policy permissions, see the Fugue docs.)
- Select Create API Client.
- You'll see a confirmation message with your new client ID and secret. You can only see the secret once, so be sure to copy the information! (Don't worry, though — if you forgot to write it down, you can revoke the old secret and generate a new one.)
4. Add the client ID and secret to the CI/CD tool
Once you've created the API credentials, you can access your CI/CD tool of choice and add the creds as environment variables at the repository/project level (rather than at organization level):
FUGUE_API_IDis the client IDFUGUE_API_SECRETis the client secret
These variables are exported during each build, giving the CI/CD tool access to sync rules to Fugue.
It's important to set these environment variables inside the CI/CD tool, rather than in the configuration file in your repository. Keep your creds safe — don't commit them to your repo, even if it's a private repo!
The steps to add environment variables to your CI/CD tool are different for each tool; for example, see the docs for CircleCI and Travis CI.
We recommend configuring your pipeline to only kick off builds when the code is merged to your main branch. In Travis CI, this requires setting "Build pushed pull requests" to OFF. After all, you don't want to update your rules in Fugue until the rules have been reviewed and merged! (CircleCI builds on pushed commits by default.)
5. Commit custom rules to the repository
Once you've completed the initial setup with your CI/CD tool, you can commit some custom rules to the repo. Make sure to add the rules to a single directory, such as my-custom-rules, which is the directory used in our example Travis CI and CircleCI configuration files.
Writing custom rules is beyond the scope of this blog post, but if you need some rules to start with, you can grab a couple from our example GitHub repo, then commit and push them to your own repo's main branch.
When you push the commit, a CI/CD build kicks off to do the following:
- Install the Fugue CLI
- Execute
fugue sync rules <directory>
Now, when custom rules are committed to main (such as after you merge a pull request), your CI/CD tool of choice will kick off a build that automatically syncs the rules in the repo to your Fugue tenant!
Things to note
When you're syncing rules, it's helpful to know the following information:
Deleting rules: Note that when you use the fugue sync rules command, rules are not deleted, only added or updated. If you want to delete a rule, use the fugue delete rule command, or send a DELETE request to the /rules/{rule_id} API endpoint.
Metadata: In order for rules to be synced to Fugue via fugue sync rules, you need to include metadata in the Rego file for each rule. The metadata is where you define the rule name, description, severity, and provider (AWS, AWS_GOVCLOUD, AZURE, GOOGLE, REPOSITORY, or any combination). For more details, including how to format the metadata, see the Custom Rules Reference and the CLI docs. You can also see our example custom rule below.
Example custom rule
If you'd like an example to get started, below is a custom rule (with metadata) that checks whether Google storage buckets have the label stage:prod. You can save this code as a .rego file in your custom rules directory:
package rules.storage_bucket_labels

__rego__metadoc__ := {
  "title": "Google storage buckets must be labeled stage:prod",
  "description": "Google storage buckets are required to have stage:prod labels",
  "custom": {
	"severity": "Medium",
	"providers": ["GOOGLE"]
  }
}

resource_type = "Google.Storage.Bucket"

default allow = false

# If the storage bucket is labeled stage:prod, it passes; otherwise
# it fails
allow {
  input.labels.stage == "prod"
}
Further reading
For more information about using the fugue sync rules command to bulk upload a directory of custom rules to Fugue, see the CLI documentation.
Interested in using Bitbucket Pipelines to sync your custom rules? See our
repository and walkthrough.
Our example CircleCI and Travis CI configuration files are in GitHub.
If you'd like to learn how to write your own custom rules, see Writing Rules. Or, to see some more examples of custom rules, visit our GitHub repo.
Finally, you can sign up for a free-forever Developer account with Fugue if you haven't already!