Fugue allows you to easily and programmatically validate your cloud infrastructure for security and compliance. By integrating Fugue into your CI/CD pipeline, you can detect resource misconfiguration and compliance violations as part of every deployment.

In part 1 of this walkthrough, we'll show you how to combine Terraform, GitHub, CircleCI, and Fugue to define, commit, deploy, and secure infrastructure as code in Amazon Web Services. You’ll be deploying infrastructure into your AWS account (see remotestate.tf and main.tf). When implemented, the pipeline looks like this:
- User writes Terraform infrastructure as code
- User commits and pushes code to GitHub
- Pushed commit triggers a CircleCI build
- CircleCI uses Terraform to deploy the infrastructure as code in AWS
- Fugue scans the infrastructure configuration and assesses compliance state
- If all resources comply with the selected standards, the build succeeds
- If any resources are noncompliant, the build fails
- Fugue sets a new baseline to facilitate tracking drift
In part 2 (coming soon!), we'll demonstrate end-to-end compliance by adding our open source tool Regula to the front of the CI/CD pipeline. Regula validates resource configuration pre-deployment and Fugue ensures it stays compliant post-deployment.

Getting Started
To get started, sign up for a free account with each pipeline component below. (Hint, hint -- try our free Fugue Developer plan! We'll walk you through how to create your first environment.)
Next, install Terraform v0.12 or later. Download Terraform, then unzip it and move it somewhere in your $PATH. You can find specific installation instructions for your operating system in the Terraform docs.
Alternatively, install tfenv, a Terraform version manager. Then, when you get to Step 3, you can just execute tfenv install and it'll install the correct version. It'll also make your life a lot easier when working with different versions of Terraform.
Steps
Here's a quick overview of what we'll do today:
- Create a Fugue environment
- Set up a GitHub repo
- Set up Terraform backend infrastructure in AWS
- Configure CircleCI
- Watch the CI/CD magic!
Step 1: Create Fugue environment
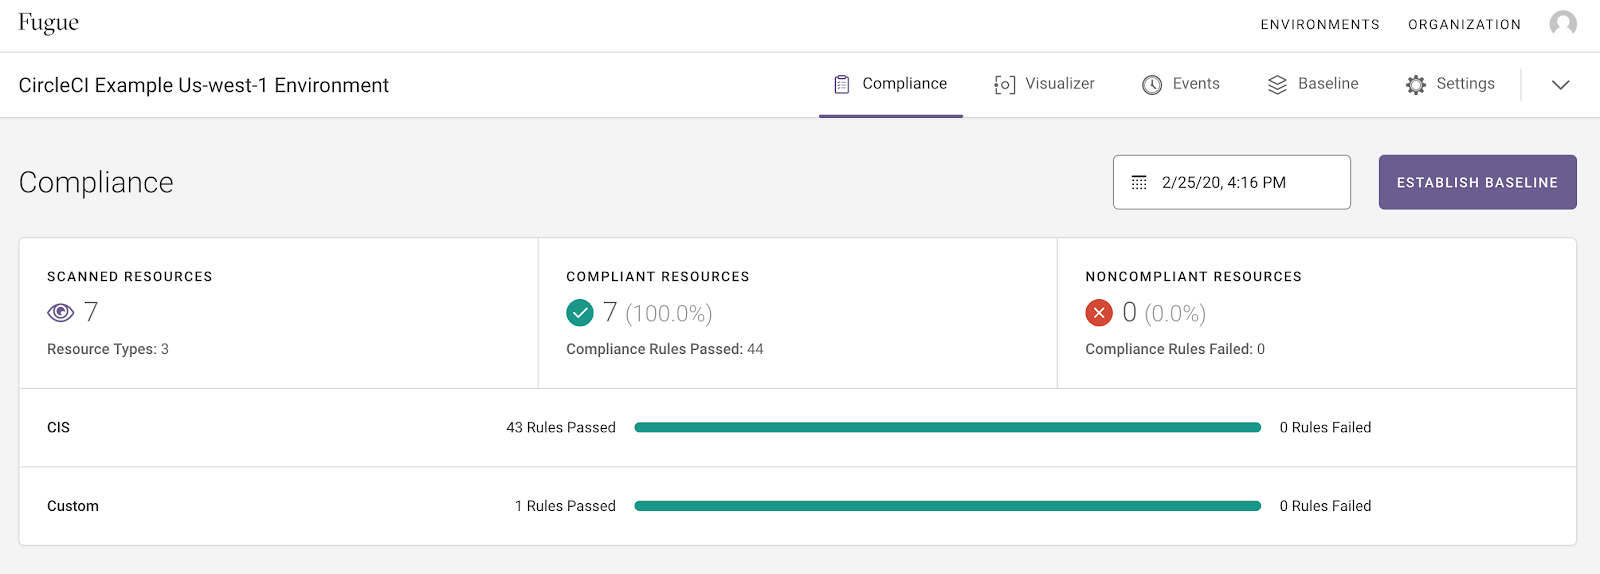
We'll start by creating a Fugue environment, which in this case represents the cloud infrastructure configuration in a given region of your AWS account. Fugue will survey the resources in the region and report whether they are compliant with a particular compliance standard.
Follow the instructions in our Hello World AWS tutorial to set up a Fugue environment. This example uses the following settings:
Region: us-west-1 (N. California)
Resource types:
- AWS.EC2.SecurityGroup
- AWS.EC2.Subnet
- AWS.EC2.Vpc
Compliance family: CIS AWS Foundations Benchmark
Once your Fugue environment is up and running, let's take a look at the GitHub part of the pipeline.
Step 2: Set up GitHub repo
GitHub acts as the trigger for the CI/CD pipeline. Pushing commits to the master branch automatically kicks off a CircleCI build that uses Terraform to deploy the infrastructure defined in the repo, and Fugue to assess the infrastructure's compliance state.
For this example, create a new GitHub repo (see docs). In your terminal, git clone your new repo:
git clone https://github.com/path-to-your-repository-goes-here.git
Next, since we've conveniently created a repo with all the code you need, you can simply download the ZIP of our example-tf-circleci repo and unzip the files into your own repo's directory.
Step 3: Set up Terraform backend
Note: If you haven't installed Terraform yet, the easiest way to do it is to install the Terraform version manager tfenv, then run tfenv install. This command installs the version specified in the .terraform-version file.
In order to deploy cloud infrastructure with Terraform and have it "remember" state, we need to set up a backend in S3, where the state will be stored. Otherwise, Terraform will try to create new infrastructure on each build, and that's not exactly what we want!
There are multiple ways to set up a backend in Terraform, but we've chosen to use an S3 backend because it is secure and simple to set up. We'll use Terraform itself to provision the infrastructure.
We will save a detailed explanation for a forthcoming blog post, so here are the highlights of the backend resources we're going to create:
- An S3 bucket for storing Terraform state
- A folder in the state bucket to hold state for Terraform projects (there are two in this example -- remotestate.tf and main.tf)
- A KMS key to enable server-side encryption (SSE) on the state bucket
- An S3 bucket for storing access logs
- A DynamoDB table for locking to prevent simultaneous operations on the same resources
We encourage you to take a look at the remotestate.tf file when you have a chance to see the specific resources you'll be deploying into your AWS account.
Change variables
Action required! Before you can commit and push the copied files to GitHub, you'll need to make two small but important edits:
Change the XXXXXXXXXXXX in the bucket name (line 3) to your 12-digit AWS account ID in two places:
The reason for the manual edits is that Terraform does not support interpolation in backend configurations, so variables cannot be used in the bucket name. These changes ensure that the bucket names you create are globally unique. You are also free to provide any name you want in the backend.tf and remotestate.tf files provided that the bucket names will be globally unique.
Deploy backend infrastructure
Now we'll deploy the backend infrastructure. From the root of your repo, cd into the remote_state directory:
cd remote_state
We need to do this in two steps. First, we'll apply the Terraform to create the backend resources, and then we'll configure the backend and migrate the state to S3.
Initialize Terraform:
terraform init
Generate a Terraform plan:
terraform plan
You should see output describing 9 resources to be created. If everything looks good, go ahead and deploy the resources:
terraform apply
Enter "yes" after checking that the plan looks correct, again.
Now, Terraform provisions your infrastructure. You'll see output describing each resource as it is created.
Note: Due to eventual consistency, you may encounter an error message like this while applying the Terraform: "Error: Error putting S3 policy: OperationAborted: A conflicting conditional operation is currently in progress against this resource. Please try again." In this case, AWS has likely attempted to create a bucket policy or public access block before the corresponding bucket is ready. Just wait a couple minutes and run the command again, and the operation should succeed.
Rename backend.tf.backup
After the backend infrastructure has been created, you can implement it by providing a backend configuration file -- backend.tf.backup, which we need to rename to backend.tf. The reason we added the .backup extension is because you must create the backend infrastructure before you can use it.
mv backend.tf.backup backend.tf
Migrate state
With our configuration file in place, we can now initialize the backend by initializing the project again:
terraform init
You'll see a message asking if you want to move the existing state to the new backend. Enter yes, and you should see a confirmation message.
Commit and push code to GitHub
The last thing to do with the repo for right now is to commit the new files and push to GitHub. Move to the root of the repo and stage the following files:
cd ..
git add .circleci/ .gitignore .terraform-version Makefile backend.tf config.mk main.tf remote_state/ scan.sh
Commit and push the changes:
git commit -m "Add CI CD example files"
git push
With remote state set up in S3 and code pushed to GitHub, we can move forward to configuring CircleCI.
Step 4: Configure CircleCI
We need to set up our project so CircleCI can start building it, so follow the CircleCI docs to add a new project. You'll need to create an AWS IAM user for CircleCI. For the purposes of this example, we've given CircleCI administrative access so it can deploy infrastructure into our account.
Next, we need to add the following environment variables:
- AWS_ACCESS_KEY_ID
- AWS_SECRET_ACCESS_KEY
- FUGUE_CLIENT_ID
- FUGUE_CLIENT_SECRET
- FUGUE_ENV_ID
To add them, head back to the CircleCI project settings page and select Environment Variables from the left nav, then select Add Environment Variable.
In the dialog that pops up, enter the name AWS_ACCESS_KEY_ID and value for the CircleCI user, then select Add Environment Variable.
Repeat the process for the AWS_SECRET_ACCESS_KEY.
Create Fugue API Client
We're going to return to Fugue for a minute. Select Organization from the top-right corner, then navigate to the API Clients tab and select Create New API Client:
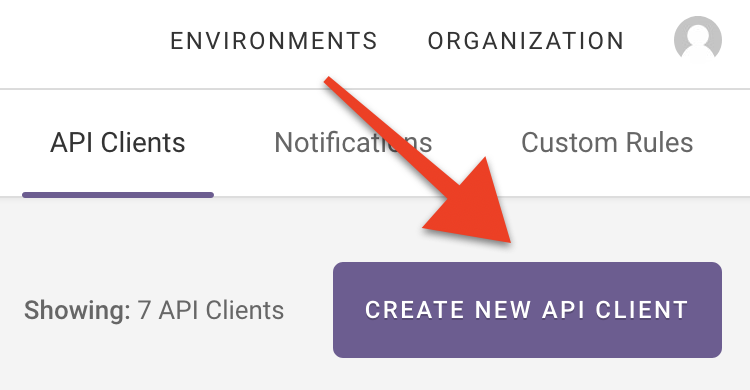
Enter an API client name, such as CircleCI Example User, and then select Create API Client.
You'll see a message that your Fugue API client has been created. Copy the client ID and client secret -- you'll only be able to view the secret once. (If do you lose the secret, you can revoke it and create a new one.)
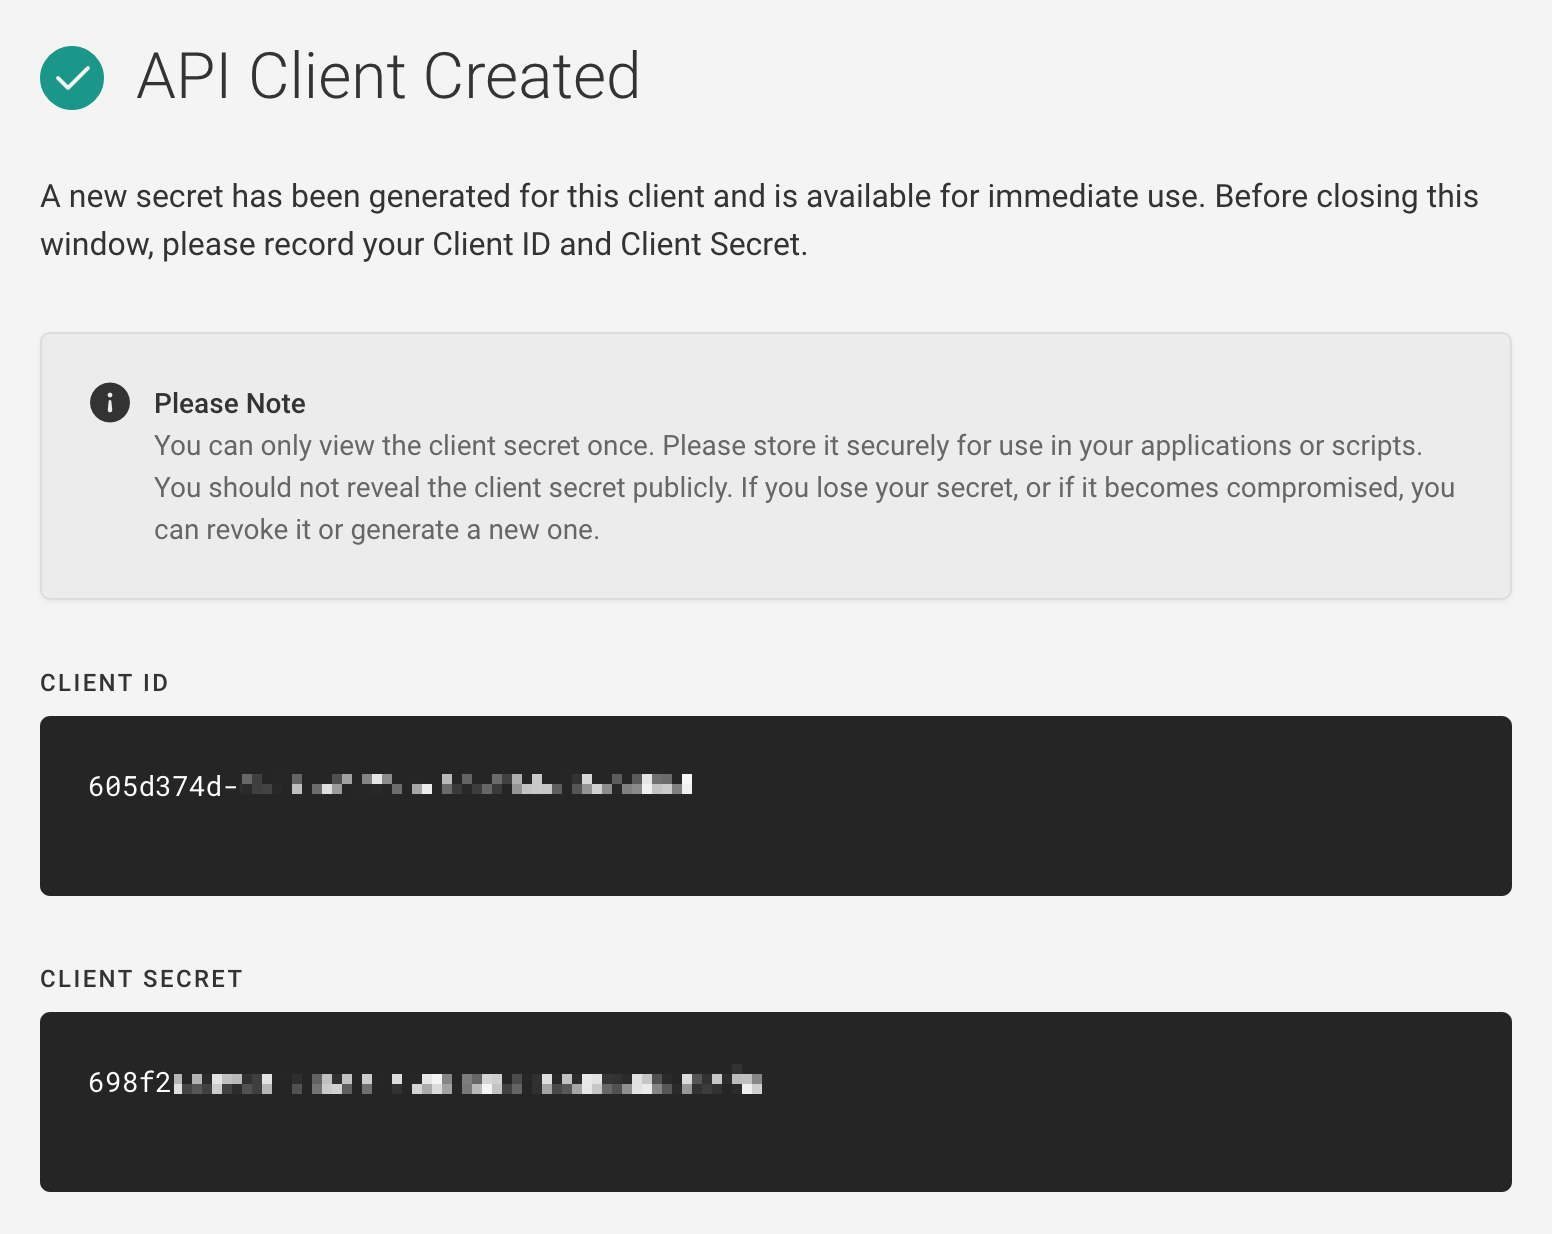
Back in CircleCI, copy the client ID and secret into the following new environment variables:
- FUGUE_CLIENT_ID
- FUGUE_CLIENT_SECRET
Specify Fugue environment
Finally, return to your Fugue environment and copy the environment ID from the page URL. It'll look something like this:
https://riskmanager.fugue.co/environments/8fd9e9a9-a27e-4508-1234-123412341234/compliance/rules
The environment ID above would be 8fd9e9a9-a27e-4508-1234-123412341234.
Back in CircleCI, create a FUGUE_ENV_ID environment variable with the value you just copied.
With CircleCI configured, we're almost ready to kick off the repo's first build. But before we continue, let's go over what will happen next.
Step 4a: Understand the pipeline
To get a better understanding of what we expect to happen during the CircleCI build, we'll examine the Terraform file, CircleCI configuration, and scan script.
main.tf
This simple Terraform configuration creates a VPC named my-fugue-cicd-vpc and a default security group in us-west-1. Because the ingress rule of the default security group allows all traffic, this resource violates CIS AWS 4-1, 4-2, and 4-3.
.circleci/config.yml
Our CircleCI workflow specifies the following jobs:
- tf-install: This command downloads Terraform 0.12.20, unzips it, and moves it to a location within the $PATH, /usr/bin.
- terraform-init: This installs the Terraform binary, then initializes the project directory. The files are persisted to the workspace so subsequent jobs can access them.
- terraform-plan: This command grabs the files persisted from the last job and generates a Terraform plan.
- terraform-apply-approval: This job is where the Terraform infrastructure as code becomes real infrastructure -- with terraform apply.
- scan: After the Terraform has been successfully applied, this job runs the scan.sh bash script, which uses the Fugue API to kick off a scan of the specified Fugue environment. If any noncompliant resources are detected, the script ensures the build fails.
scan.sh
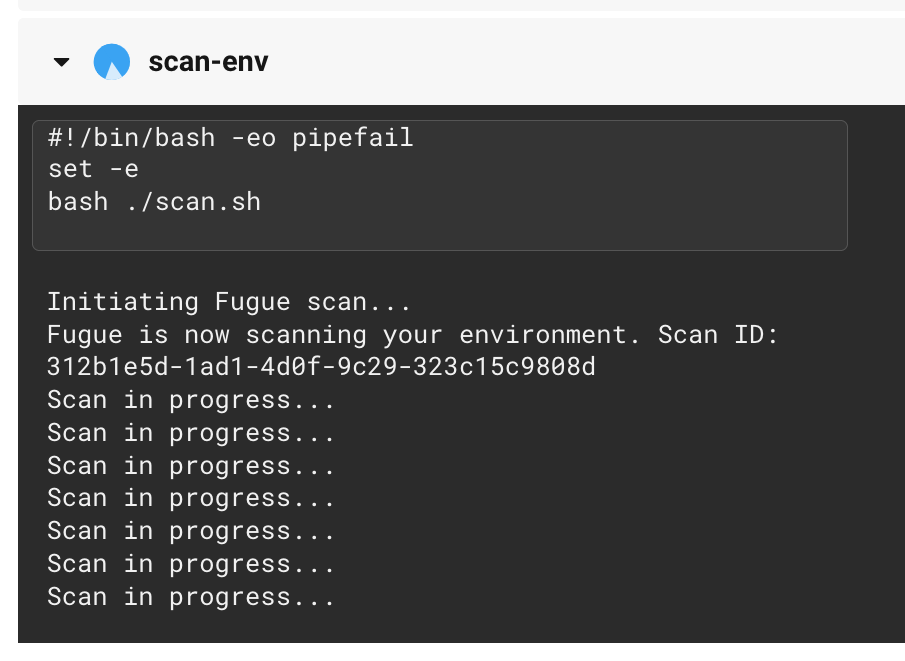
The scan script first uses the Fugue API to kick off a scan of the Fugue environment specified in the FUGUE_ENV_ID environment variable.
Next, every 15 seconds, CircleCI uses the Fugue API to check the status of the scan. If it's still in progress, it keeps checking.
When the scan is no longer in progress, the scan results are saved to scan_results.json.
Then, the following happens:
If the scan succeeded and any noncompliant resources were detected:
- Print the number of noncompliant resources along with their resource IDs.
- Set the resource configuration recorded in the scan as the new baseline. This facilitates drift detection, should you have notifications enabled.
- Fail the workflow so the user knows there were compliance violations in the deployment.
If the scan succeeded and zero noncompliant resources were detected:
- Print a success message.
- Set the resource configuration recorded in the scan as the new baseline.
- Pass the workflow unless the baseline update failed, in which case the overall workflow fails.
If anything else happened:
- Print an error message.
- Do not update the baseline.
- Fail the workflow.
We've discussed in depth what the pipeline does, so it's finally time to see it in action!
Step 5: Watch the CI/CD magic!
OK, it's not magic, it's automation. But we think it's pretty cool.
Trigger workflow
Action required! In line 61 of .circleci/config.yml, we've commented out the actual command that applies the Terraform using the plan.tfplan file generated in the previous job. When you're comfortable with the understanding that Terraform will deploy infrastructure into your account, trigger the CircleCI build by uncommenting line 61.
Then, commit and push the changes:
git add .circleci/config.yml
git commit -m "Uncomment Terraform apply step"
git push
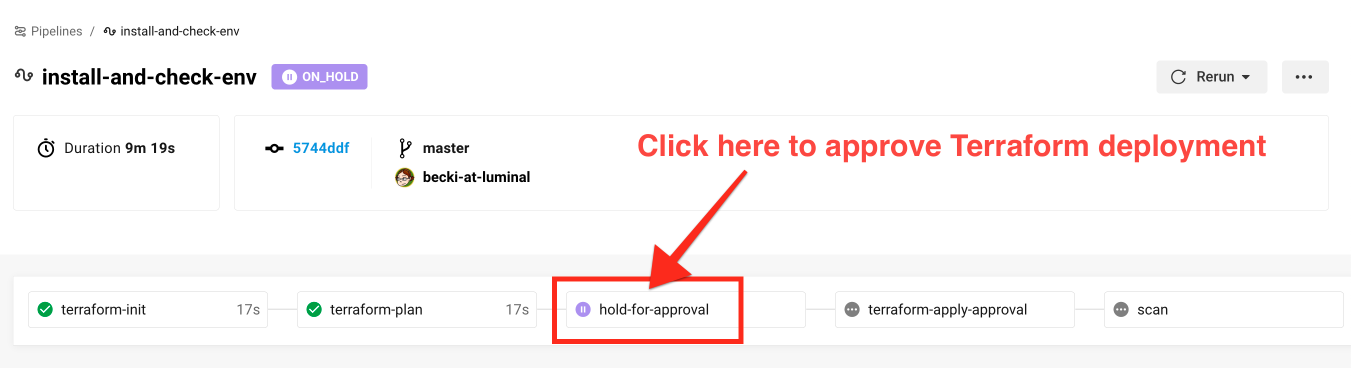
Then, head on over to your CircleCI dashboard, where you'll see the automation in action. You should be able to find the workflow by selecting the Pipelines link in the left nav:
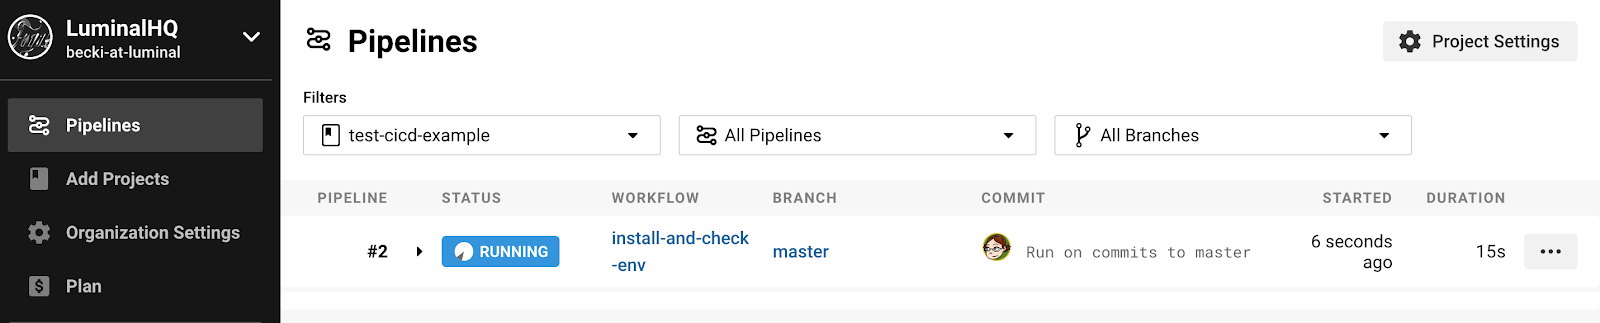
Click on the status to see CircleCI proceed through each step of the workflow.
Action required! When CircleCI gets to the terraform-apply-approval job, you'll need to manually approve the deployment before Terraform can apply it, preferably after carefully reviewing the output of the terraform-plan job. Select the hold-for-approval button:
After the Terraform is applied, the scan job is initiated:
Failed build
Give Fugue a couple minutes to finish scanning your environment. When it's done, you should see that the workflow has failed!
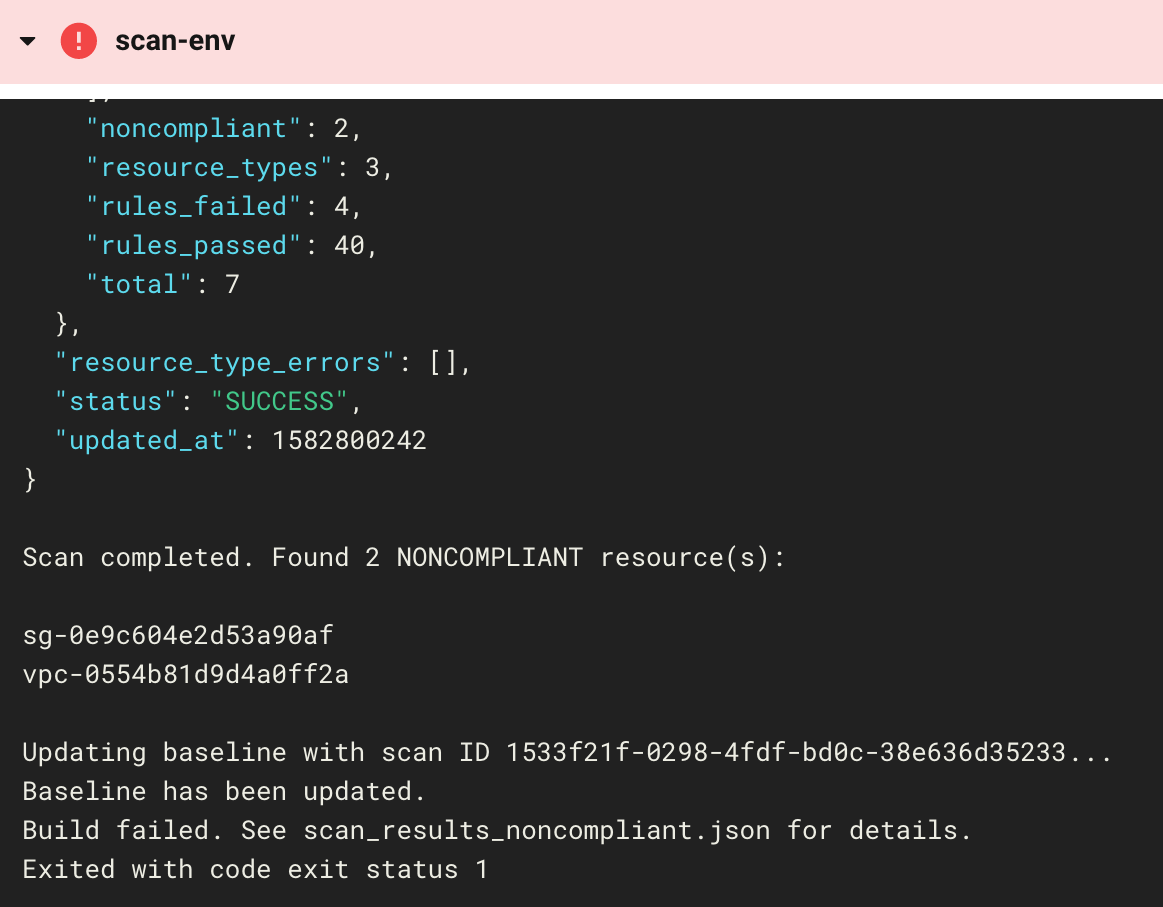
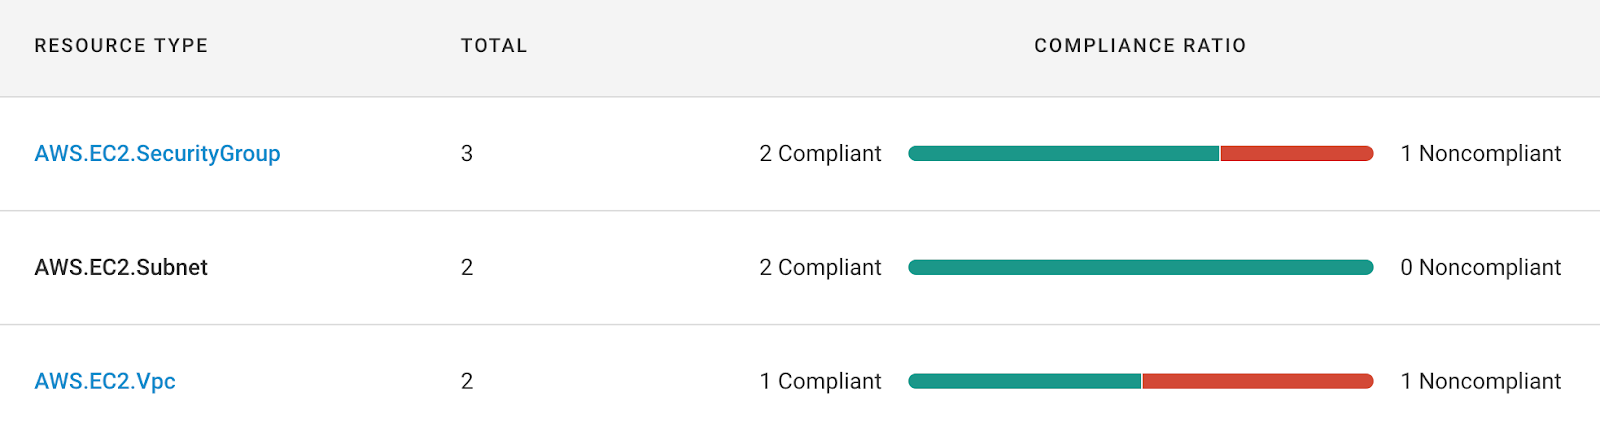
This is actually a good thing, because the failed workflow tells us that the VPC and security group we created were noncompliant. We can look at the scan results in the log and see that the resources violated three compliance controls:
- CIS AWS 4-1, Ensure no security groups allow ingress from 0.0.0.0/0 to port 22
- CIS AWS 4-2, Ensure no security groups allow ingress from 0.0.0.0/0 to port 3389
- CIS AWS 4-3, Ensure the default security group of every VPC restricts all traffic
If we want more details, we can view the environment in the Fugue UI. For the full results, SSH into the build and read scan_results.json.
Fugue has also updated the baseline for us. The compliance state of the infrastructure right now might not be what we want, but setting a baseline is quite useful for detecting drift. When the next scan is completed, Fugue will list any changes since the last scan.
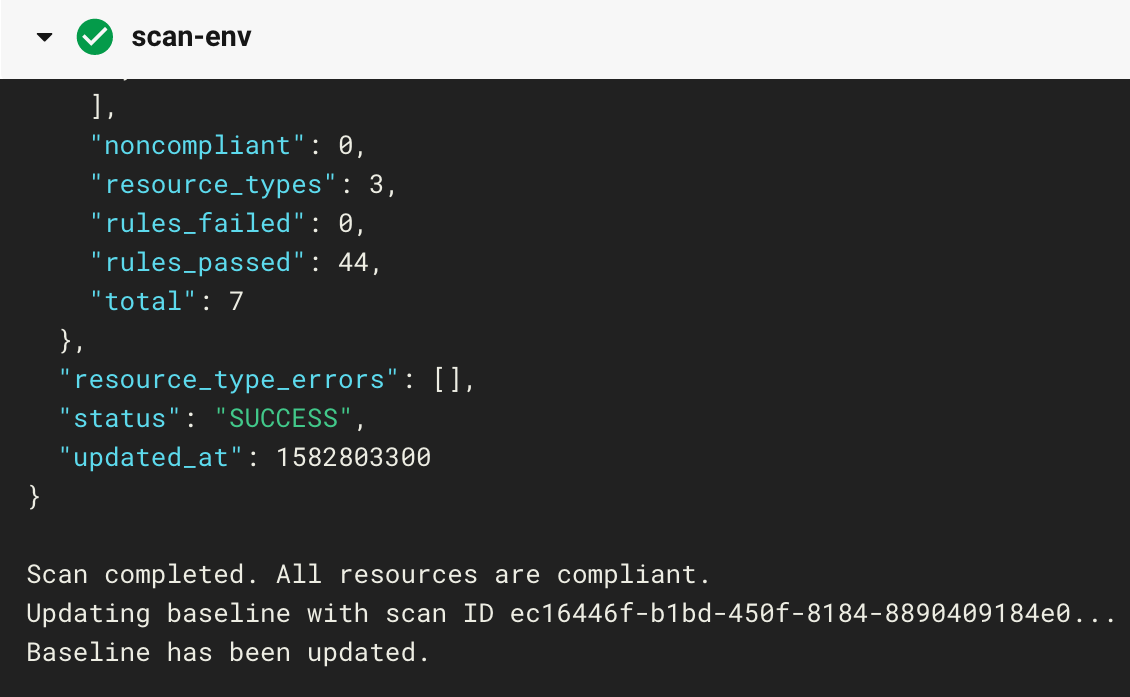
Passing build
When all resources are compliant, you will see the following message in CircleCI:
Scan completed. All resources are compliant.
Updating baseline with scan ID ec16446f-b1bd-450f-8184-8890409184e0...
Baseline has been updated.
To achieve these results in your own build, comment out the ingress rule in the default security group (lines 16-21 of main.tf), then commit and push. To fix any other resources in your region that are out of compliance, follow the rule remediation steps on the docs site.
What's Next?
Coming soon -- we'll show you how to achieve end-to-end compliance and security by adding Regula, a pre-deployment compliance assessment tool, to this very pipeline.
We'll also discuss in more detail how we designed the S3 backend infrastructure with security in mind.
Further reading
Don't forget to visit the example-tf-circleci repo, which contains all of the code in this example.
If you'd like to sign up for a free Enterprise trial, or a free-forever Developer account, register here.
Finally, for more about Fugue, see the Fugue docs and fugue.co.