Regula 2.3.0 enables cloud teams to evaluate Terraform, CloudFormation, Azure Resource Manager, and Kubernetes infrastructure as code (IaC) for security and compliance violations prior to deployment. Integrating Regula into continuous integration/continuous delivery (CI/CD) pipelines takes this a step further by automating the secure deployment of cloud infrastructure.
In this blog post, we’ll demonstrate how to integrate Regula with Bitbucket Pipelines (an integrated CI/CD service built into Bitbucket) for automated testing of Amazon Web Services (AWS) resources declared in Terraform. When we commit to our repository containing Terraform, we’ll trigger a build with Bitbucket Pipelines. We’ll show how Regula catches a security vulnerability and fails the CI build, and we’ll show how to remediate the violation so the build passes.
When we’re done, the CI/CD pipeline will execute the following flow:
- You commit IaC to a branch (in this example, we’re committing to the main branch for the sake of simplicity, but this can be done – and customized – for pull requests as well).
- You push the commits, triggering a Bitbucket Pipelines build.
- Bitbucket Pipelines runs Regula against your repository (in this example, we have also included Terraform formatting and validation checks to demonstrate best practices).
- If the IaC in your repository passes all of Regula’s checks, the Bitbucket Pipelines build passes. Otherwise, it fails.
Tip: While each CI/CD tool is unique, you can still follow the steps above to check your IaC in CI/CD with Regula.
Prerequisites
To follow along, you’ll need the following:
- A Bitbucket account (either a Bitbucket cloud or Bitbucket server account)
- Multi-factor authentication enabled in your Bitbucket account
- Cloud provider account and credentials loaded into Bitbucket as repository variables (for this demonstration, I'll be using AWS)
- A Bitbucket repository (cloned locally) containing cloud resources declared with Terraform (see below for how my repository is structured)
What’s in the repo?
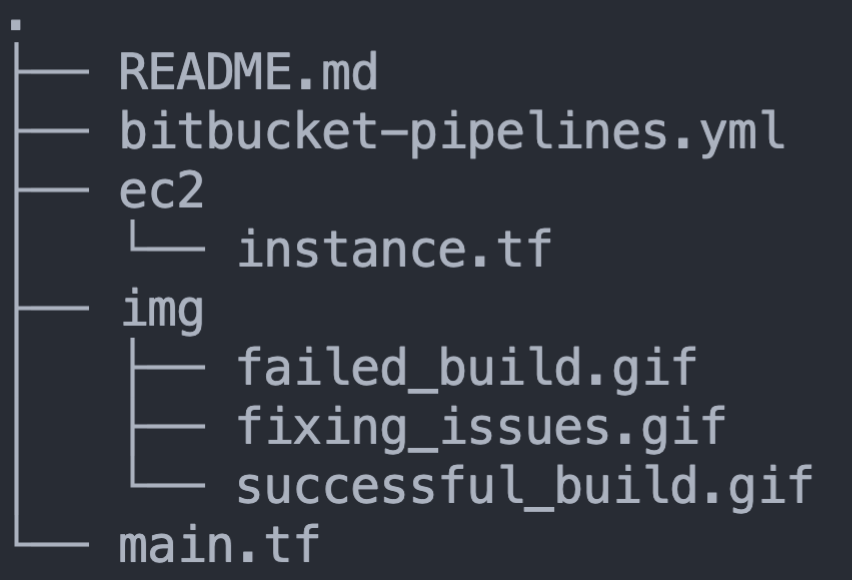
What you see above is a visual representation of the file structure for the above repo, which most notably contains:
main.tf: A Terraform file that declares provider and account informationec2/instance.tf: A Terraform file that contains an intentional vulnerability.regula.yaml: a Regula configuration file that declares how I want Regula to be run in this repositorybitbucket-pipelines.yml: A Bitbucket Pipelines configuration file
Set up Bitbucket Pipelines
Now we’ll set up Bitbucket Pipelines to run builds for our repository. From within your Bitbucket repository, click “Repository Settings” along the left side of the page, then scroll down to the bottom of the menu that appears on the left side of the page to the “Pipelines” section. Click “Settings,” then click the slider next to “Enable Pipelines” so that it appears green with a white checkmark.
The files
Let’s take a look at the individual files in our repository, starting with ec2/instance.tf.
The vulnerable Terraform
The ec2/instance.tf Terraform HashiCorp Configuration Language (HCL) file declares the following AWS resources:
- An Elastic Compute Cloud (EC2) instance
- An Identity and Access Management (IAM) role to access the above EC2 instance
To demonstrate the simple power of Regula, I’ve intentionally included security vulnerabilities (and commented hints that indicate how we can fix them) in the EC2 instance (note: don’t deploy this Terraform to AWS without fixing these security violations). Let’s dig into these vulnerabilities:
resource "aws_instance" "app_server18391111" {
    ami           = "ami-074cce78125f09d61"
    instance_type = "t2.micro"

    # Un-comment below to satisfy FG_R00253
    #iam_instance_profile = aws_iam_instance_profile.test_profile.name

    # Make the below declaration = false to satisfy FG_R00271
    associate_public_ip_address = true

    tags = {
        Name = "ExampleAppServerInstance18391111"
        Team = "dev"
    }
}- Line 9 (currently commented out) contains the association between our EC2 instance and the IAM role and instance profile which should be used to access it instead of IAM access keys. If you pass role information to an EC2 instance at launch, you can limit the risk of access key exposure and help prevent a malicious user from compromising the instance
- Line 12 declares that the EC2 instance should have an associated public IP address, which could allow unauthorized users access to your EC2 instance, despite having network access control lists or security groups
Deploying this EC2 instance as-is into production would expose us to malicious actors, who could detect and exploit this vulnerability using automation tools far before we even know this vulnerability exists! Luckily, Regula includes hundreds of rules to scan our IaC for violations of Center for Internet Security (CIS) Benchmarks.
Bitbucket Pipelines configuration
Let’s break down how the bitbucket-pipelines.yml file tells Bitbucket Pipelines what to do when a build is triggered. First, we let Bitbucket know that this is a pipeline and, in fact, the default pipeline (you can create a separate pipeline for pull requests, for different branches of the repo, and other reasons):
pipelines:
 default:
I've opted to have the following steps run sequentially, but I can also opt for them to run in parallel by adding the parallel command in the column to the left of the steps.
Next, I'll declare my first step, which uses the HashiCorp Terraform image to initialize Terraform, adjust my Terraform formatting to HCL canonical standards, and ensure the validity of my Terraform (for example, ensuring I have declared all of my variables and modules):
- step:
    name: 1 - Initialize, Format, and Validate Terraform
    image: hashicorp/terraform
    script:
        - terraform init && terraform fmt
        - terraform validate
The second step in my pipeline harnesses the power of Regula by automatically detecting any IaC files (Terraform, Cloudformation, Azure Resource Manager, and Kubernetes manifests) in the root or any child directories, and scanning every IaC file detected in my repository against CIS Benchmark standards (Fugue provides out-of-the-box support for additional compliance families such as SOC 2, HIPAA, and NIST 800-53).
- step:
    name: 2 - Scan Terraform Locally for Security and Compliance with CIS Benchmarks
    image: fugue/regula
    script:
        # Run in root directory first
        - regula run ./
        # Run in child directories next
        - regula run ./*/
The final step re-initializes Terraform and engages the HashiCorp Terraform image again, because each step in the Bitbucket pipeline runs a separate Docker container, so declared dependencies do not carry over between steps. The final step then creates a Terraform plan and applies the plan:
- step:
    name: 3 - Plan and Apply Secure, Valid Terraform
    image: hashicorp/terraform
    deployment: Production
    trigger: manual
    script:
        - terraform init
        - terraform plan
        - terraform apply -auto-approve
Kick off a build
Trying (and failing) a build
I begin by entering the following commands in my terminal after completing edits on my repository containing IaC files:
git add
git commit -m "initiating the bitbucket pipeline"
git push
Upon detecting the new commit to my repository (or being manually commanded to do so), Bitbucket Pipelines will trigger the pipeline described in the .yml file above. See below for what happens when I try to commit to the main branch of the repository with Terraform that violates CIS Benchmarks:
Resolving configuration issues with Regula
Now that I know I have misconfigurations in my Terraform files, I can go back into my repo and run Regula locally to address those issues. I set up this repository to allow me to un-comment my Terraform code corrections easily, but properly configuring your infrastructure is as easy as clicking the Fugue rule remediation documentation hyperlink that populates with every rule violation following a regula run. See below for how I fixed Fugue rules FG_R00253 and FG_R00271, then re-checked my infrastructure with a final regula run.
Trying (successfully!) a build
With my infrastructure properly configured, I'll commit to my Bitbucket repository again to maximize the automation provided by the Bitbucket Pipeline I have configured for my repository.
I’ll re-run the commands I ran initially…
git add
git commit -m "initiating the bitbucket pipeline"
git push
…resulting in a successful build:
And that's it! Now we have a Regula/Bitbucket Pipeline to securely automate the deployment of cloud infrastructure using Terraform.
Run Regula locally
Fortunately, you don’t have to wait for Bitbucket Pipelines (or other CI/CD tools) to find the errors for you. You can run Regula locally before you commit and push your changes, and in fact we recommend you do so! My personal favorite is the Regula pre-commit hook, which operationalizes defense-in-depth by forcing developers to remediate security and compliance violations before committing their code. By catching issues earlier in the development cycle, you “extend left” on security, speeding up development and saving time, money, and frustration later.
First, install Regula locally. It’s a single, self-contained binary, so there’s no need to install any prerequisites. Just follow the steps in the documentation according to your operating system.
Then, from the root of your repository, run the same command that Bitbucket Pipelines runs:
regula run
You’ll see the same output that you see in the Bitbucket Pipelines logs, but by running this locally, you will avoid expending build minutes and distribute the responsibilities of security teams to the developer level, thus reducing (or eliminating altogether!) security-driven bottlenecks prior to deployment.
Next steps
Want to learn more about Regula? See our GitHub repo and documentation. Regula evaluates Terraform HCL, Terraform plan JSON, CloudFormation YAML/JSON, Kubernetes YAML manifests, and Azure Resource Manager templates for security and compliance. Regula also supports waivers, custom rules, enabling or disabling rules, and more.
Interested in other ways to automate the secure deployment of cloud infrastructure? Check out our blog post about integrating Regula and Travis CI.
You can also use Regula with Fugue to achieve end-to-end security and compliance across the entire software development lifecycle – from development to deployment to runtime. For more information about Fugue, visit www.fugue.co.